Air Damn
Air dams don't always line up "perfectly" like the seller claims.
How Air Dams Work
 Not everybody is a fan of air dams. I wanted from the very beginning.
They're really just for racing. As the name implies, it "dams" the air, pushing it around the sides of the car to prevent it from going underneath the body, where it can cause turbulence, which in turn can slow the car down. If you look at actual race cars, the air dam is usually so low that it nearly scrapes the pavement.
It doesn't do anything for day-to-day street driving, aside from looking cool.
Installing one is a relatively simple process - remove the bumper, the turn signals and the lower valance beneath the grill. Then you drill a few holes and attach it with bolts and washers that typically come with the dam itself. However, like so many things in life, it's rarely that easy.
Not everybody is a fan of air dams. I wanted from the very beginning.
They're really just for racing. As the name implies, it "dams" the air, pushing it around the sides of the car to prevent it from going underneath the body, where it can cause turbulence, which in turn can slow the car down. If you look at actual race cars, the air dam is usually so low that it nearly scrapes the pavement.
It doesn't do anything for day-to-day street driving, aside from looking cool.
Installing one is a relatively simple process - remove the bumper, the turn signals and the lower valance beneath the grill. Then you drill a few holes and attach it with bolts and washers that typically come with the dam itself. However, like so many things in life, it's rarely that easy.
Smooth Fiberglass or Polyurethane with Vents
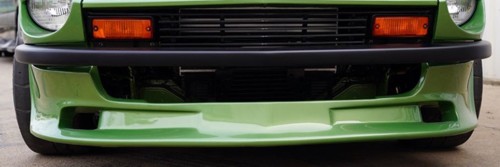 The first thing is to choose which type you want. I went for the "smooth" version, which are usually made from fiberglass. The one shown here comes with molded vents which can be used to cool the front brakes, and those type of dams are typically molded polyurethane. Each type has plusses and minuses.
The fiberglass versions are fairly robust and don't need extra bracing, but they can crack or break if you run over something, or if you get too close to a parking lot concrete bumper.
The polyurethane versions are flexible and not easily damaged. However, they need an additional brace in the middle because at highway speeds the force of the air can (sometimes) push the front of the dam underneath the car. It'll pop back out when you slow down.
However, there can be a problem with both versions but only the fiberglass one can be fixed, as follows.
The first thing is to choose which type you want. I went for the "smooth" version, which are usually made from fiberglass. The one shown here comes with molded vents which can be used to cool the front brakes, and those type of dams are typically molded polyurethane. Each type has plusses and minuses.
The fiberglass versions are fairly robust and don't need extra bracing, but they can crack or break if you run over something, or if you get too close to a parking lot concrete bumper.
The polyurethane versions are flexible and not easily damaged. However, they need an additional brace in the middle because at highway speeds the force of the air can (sometimes) push the front of the dam underneath the car. It'll pop back out when you slow down.
However, there can be a problem with both versions but only the fiberglass one can be fixed, as follows.
They Don't Always Fit Very Well
 Some air dams are quality items which will bolt into place and look great, but the "inexpensive" ones rarely fit very well.
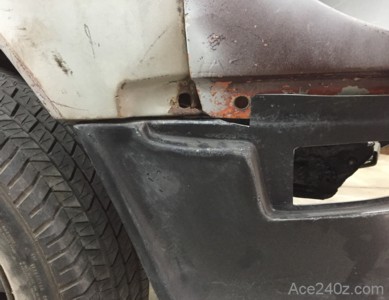
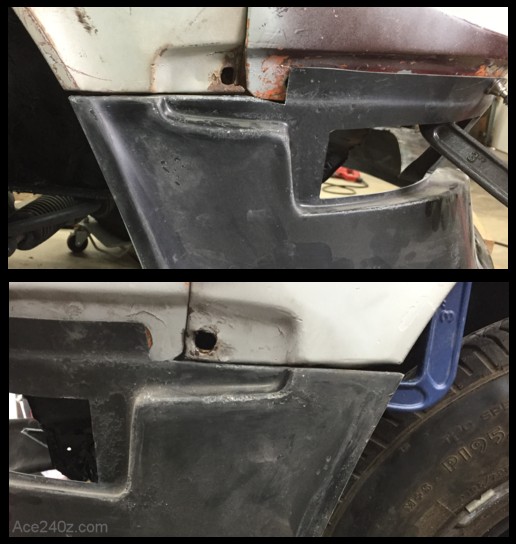
I originally bought a polyurethane version, but the ends of it didn't line up with the wheel arches. I didn't want perfection but the gap was about an inch, which is very noticeable. It went right back into the box and returned to the store.
I bought a fiberglass version and it didn't line up either. You can see the gap in the photo. I didn't care for that, but it could be solved.
The difference between the fiberglass and polyuerethane version is that fiberglass version can be cut and bonded back together, but the polyurethane can't. It's a soft plastic with a "slippery" property and glue won't stick to it. You'd need some sort of screwed or bolted splice to hold the halves together.
Some air dams are quality items which will bolt into place and look great, but the "inexpensive" ones rarely fit very well.
I originally bought a polyurethane version, but the ends of it didn't line up with the wheel arches. I didn't want perfection but the gap was about an inch, which is very noticeable. It went right back into the box and returned to the store.
I bought a fiberglass version and it didn't line up either. You can see the gap in the photo. I didn't care for that, but it could be solved.
The difference between the fiberglass and polyuerethane version is that fiberglass version can be cut and bonded back together, but the polyurethane can't. It's a soft plastic with a "slippery" property and glue won't stick to it. You'd need some sort of screwed or bolted splice to hold the halves together.
Cut It In Half
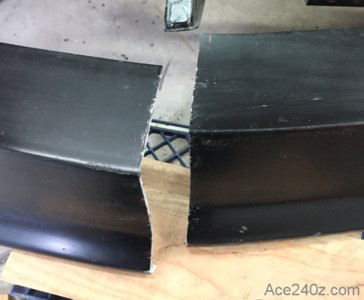 The first step was to mark the center and draw a line. It was easy enough to cut with a sabre saw and it doesn't have to be perfect.
It's really a leap of faith to cut something you just bought. Once you make the cut there's no going back.
The first step was to mark the center and draw a line. It was easy enough to cut with a sabre saw and it doesn't have to be perfect.
It's really a leap of faith to cut something you just bought. Once you make the cut there's no going back.
Line Up The Ends
 I started on the passenger side and got the curve of the dam aligned with the arch, then clamped it in place. The recess for the bumper was still a little off, but nobody will see that when the bumper is in place.
I drilled some holes between the tip of the air dam and the bottom of the steel to add some little bolts to keep everything aligned. The main mounting point is underneath the turn signals. Larger bolts went into those spots. When the whole thing was finished, the connection is so solid that I can hold onto the dam and rock the car back and forth.
I did the same type of alignment and clamping on the driver's side.
I started on the passenger side and got the curve of the dam aligned with the arch, then clamped it in place. The recess for the bumper was still a little off, but nobody will see that when the bumper is in place.
I drilled some holes between the tip of the air dam and the bottom of the steel to add some little bolts to keep everything aligned. The main mounting point is underneath the turn signals. Larger bolts went into those spots. When the whole thing was finished, the connection is so solid that I can hold onto the dam and rock the car back and forth.
I did the same type of alignment and clamping on the driver's side.
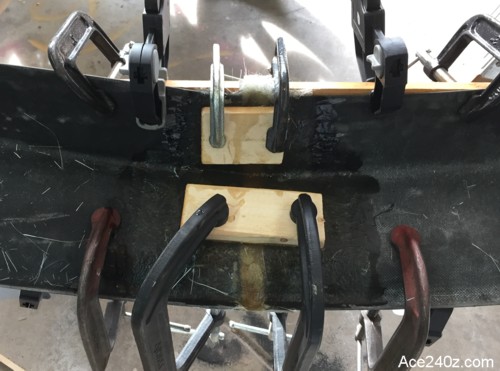
Align and Clamp The Gap
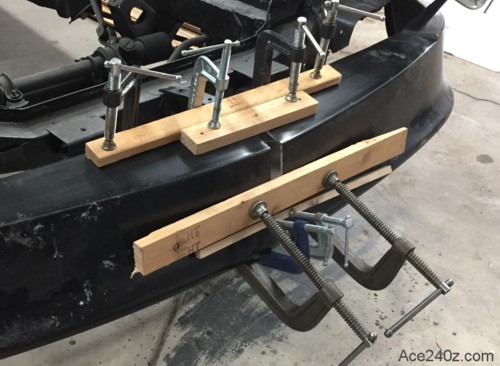 With the ends in place, it was time to clamp the gap. It took a little fiddling to get it centered left and right, and to get it level when looking at it from the front.
I used a lot of clamps because it has to be taken off the car to do the fiberglass patching and I didn't want anything to move or slip. Messing up at this point would be a genuine buzz-kill.
Unfortunately, I had forgotten to add a strip of duct tape between the gap to act as a "mold" to hold the wet fiberglass and keep it from sagging. What you see here had to be taken apart, then redone.
With everything ready, I set it on a couple of sawhorses and secured it tightly.
With the ends in place, it was time to clamp the gap. It took a little fiddling to get it centered left and right, and to get it level when looking at it from the front.
I used a lot of clamps because it has to be taken off the car to do the fiberglass patching and I didn't want anything to move or slip. Messing up at this point would be a genuine buzz-kill.
Unfortunately, I had forgotten to add a strip of duct tape between the gap to act as a "mold" to hold the wet fiberglass and keep it from sagging. What you see here had to be taken apart, then redone.
With everything ready, I set it on a couple of sawhorses and secured it tightly.
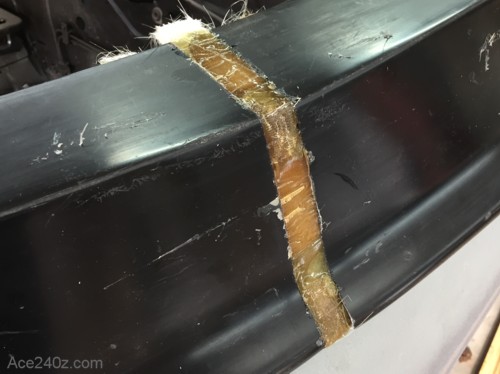
New fiberglass
 Adding the new fiberglass is actually pretty easy. Cut a couple of pieces of mat to fit between the halves, then cut a few more to overlap the gap for a couple inches. Poke around a little on the Internet to see some good examples of how it's done.
Mix the resin the same way you'd mix expoxy, then use a paintbrush to "impregnate" resin into the mat. I started with a couple brushes of resin onto the duct tape "mold", then added a strip of mat, worked resin into it, then added subsequent layers.
I added a couple pieces of wood for extra reinforcement, and covered them with fiberglass to seal them from water. They ended up a little crooked but that didn't matter because nobody will see it from the front. It amused my painter but he agreed it did what was needed.
Typically the resin is fully cured within an hour or two, but I let mine cure overnight.
Adding the new fiberglass is actually pretty easy. Cut a couple of pieces of mat to fit between the halves, then cut a few more to overlap the gap for a couple inches. Poke around a little on the Internet to see some good examples of how it's done.
Mix the resin the same way you'd mix expoxy, then use a paintbrush to "impregnate" resin into the mat. I started with a couple brushes of resin onto the duct tape "mold", then added a strip of mat, worked resin into it, then added subsequent layers.
I added a couple pieces of wood for extra reinforcement, and covered them with fiberglass to seal them from water. They ended up a little crooked but that didn't matter because nobody will see it from the front. It amused my painter but he agreed it did what was needed.
Typically the resin is fully cured within an hour or two, but I let mine cure overnight.
The Patch
 Here's how the splice turned out. The duct tape worked exactly as hoped and peeled off easily, leaving a relatively smooth surface.
I used a sander to take off the high spots and smooth out the edges, then used Bondo to fill the little pits, followed by more sanding. I gave it some cautious twists and prods and it seems to be as rigid as before I started doing the work.
Here's how the splice turned out. The duct tape worked exactly as hoped and peeled off easily, leaving a relatively smooth surface.
I used a sander to take off the high spots and smooth out the edges, then used Bondo to fill the little pits, followed by more sanding. I gave it some cautious twists and prods and it seems to be as rigid as before I started doing the work.
The Finished Product
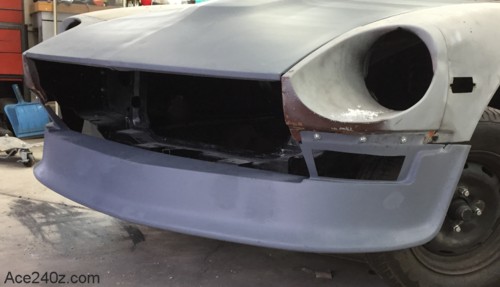 Here's how it looked after more sanding, some primer, and bolted into place. Behind it I painted the back side black, which pretty much makes the patch invisible. It probably didn't need a center brace, but I added one between the wood reinforcement and the lower mount for the grill.
My painter did the final filling and sanding and you'd never know the dam had been changed.
The total time for the splice (not counting the cure time) was about 3 hours plus another 2 hours to get the finished dam attached, but part of that was due to the complexity of my car's front bodywork. That seems like a lot to get it properly aligned with the wheel arches, but that's what it takes to make a car really stand out. Most people would never notice but it would have bugged me if I hadn't done the work, and now that you've seen the before and after I'll bet you look at that part of any air dam you see in the future.
Here's how it looked after more sanding, some primer, and bolted into place. Behind it I painted the back side black, which pretty much makes the patch invisible. It probably didn't need a center brace, but I added one between the wood reinforcement and the lower mount for the grill.
My painter did the final filling and sanding and you'd never know the dam had been changed.
The total time for the splice (not counting the cure time) was about 3 hours plus another 2 hours to get the finished dam attached, but part of that was due to the complexity of my car's front bodywork. That seems like a lot to get it properly aligned with the wheel arches, but that's what it takes to make a car really stand out. Most people would never notice but it would have bugged me if I hadn't done the work, and now that you've seen the before and after I'll bet you look at that part of any air dam you see in the future.